3.0) Deploying an app to a Swarm
See also
Contents
- 3.0) Deploying an app to a Swarm
Introduction
This portion of the tutorial will guide you through the creation and customization of a voting app. It’s important that you follow the steps in order, and make sure to customize the portions that are customizable.
Warning
To complete this section, you will need to have Docker installed on your machine as mentioned in the Setup section. You’ll also need to have git installed. There are many options for installing it. For instance, you can get it from GitHub.
Voting app
For this application we will use the Docker Example Voting App.
This app consists of five components:
- Python webapp which lets you vote between two options
- Redis queue which collects new votes
- DotNET worker which consumes votes and stores them in
- Postgres database backed by a Docker volume
- Node.js webapp which shows the results of the voting in real time
Clone the repository onto your machine and cd into the directory:
git clone https://github.com/docker/example-voting-app.git
Y:\projects_id3\P5N001\XLOGCA135_tutorial_docker\tutorial_docker\samples\labs\votingapp>git clone https://github.com/docker/example-voting-app.git
Cloning into 'example-voting-app'...
remote: Counting objects: 463, done.
remote: Compressing objects: 100% (12/12), done.
remote: Total 463 (delta 4), reused 12 (delta 4), pack-reused 447
Receiving objects: 100% (463/463), 226.49 KiB | 318.00 KiB/s, done.
Resolving deltas: 100% (167/167), done.
cd example-voting-app
Deploying the app
For this first stage, we will use existing images that are in Docker Store.
This app relies on Docker Swarm mode. Swarm mode is the cluster management and orchestration features embedded in the Docker engine. You can easily deploy to a swarm using a file that declares your desired state for the app.
Swarm allows you to run your containers on more than one machine.
In this tutorial, you can run on just one machine, or you can use something like Docker for AWS or Docker for Azure to quickly create a multiple node machine. Alternately, you can use Docker Machine to create a number of local nodes on your development machine. See the Swarm Mode lab for more information.
docker swarm init
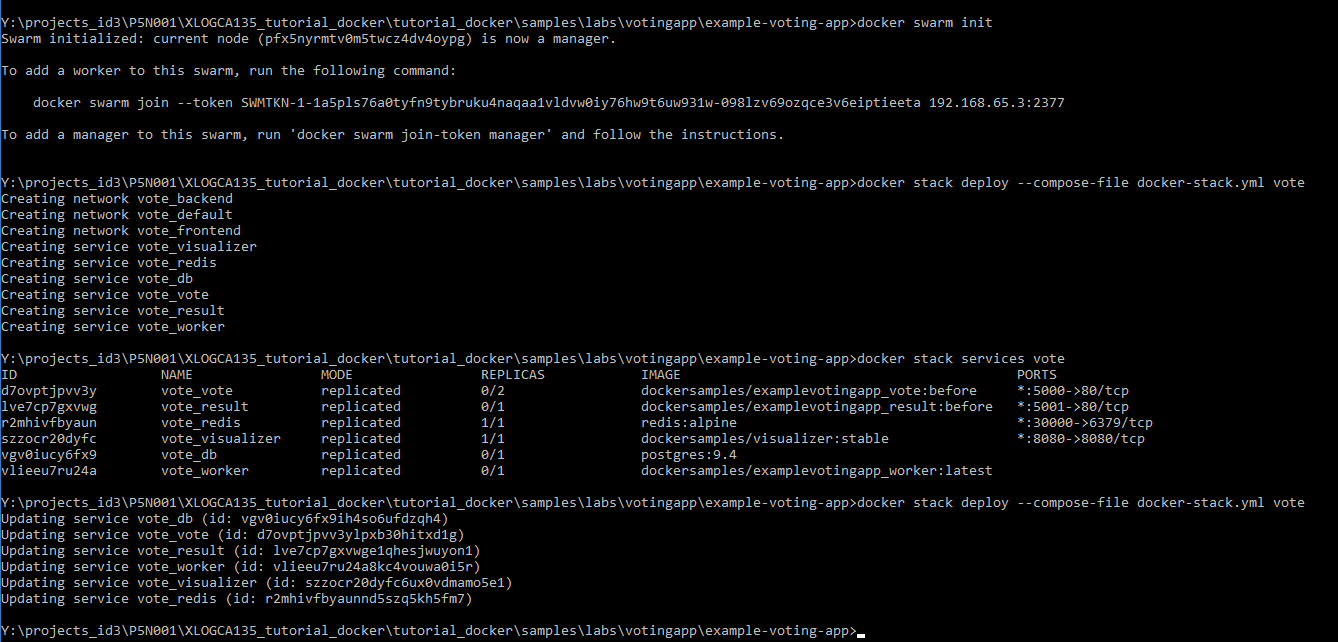
First, create a Swarm.
docker swarm init
Y:\projects_id3\P5N001\XLOGCA135_tutorial_docker\tutorial_docker\samples\labs\votingapp\example-voting-app>docker swarm init
Swarm initialized: current node (pfx5nyrmtv0m5twcz4dv4oypg) is now a manager.

To add a worker to this swarm, run the following command:

        docker swarm join --token SWMTKN-1-1a5pls76a0tyfn9tybruku4naqaa1vldvw0iy76hw9t6uw931w-098lzv69ozqce3v6eiptieeta 192.168.65.3:2377

To add a manager to this swarm, run 'docker swarm join-token manager' and follow the instructions.
Next, you will need a Docker Compose file. You don’t need Docker Compose installed, though if you are using Docker for Mac or Docker for Windows you have it installed. However, docker stack deploy accepts a file in the Docker Compose format. The file you need is in Docker Example Voting App at the root level. It’s called docker-stack.yml.
Docker compose file : docker-stack.yml
version: "3"
services:

  redis:
        image: redis:alpine
        ports:
          - "6379"
        networks:
          - frontend
        deploy:
          replicas: 1
          update_config:
                parallelism: 2
                delay: 10s
          restart_policy:
                condition: on-failure
  db:
        image: postgres:9.4
        volumes:
          - db-data:/var/lib/postgresql/data
        networks:
          - backend
        deploy:
          placement:
                constraints: [node.role == manager]
  vote:
        image: dockersamples/examplevotingapp_vote:before
        ports:
          - 5000:80
        networks:
          - frontend
        depends_on:
          - redis
        deploy:
          replicas: 2
          update_config:
                parallelism: 2
          restart_policy:
                condition: on-failure
  result:
        image: dockersamples/examplevotingapp_result:before
        ports:
          - 5001:80
        networks:
          - backend
        depends_on:
          - db
        deploy:
          replicas: 1
          update_config:
                parallelism: 2
                delay: 10s
          restart_policy:
                condition: on-failure

  worker:
        image: dockersamples/examplevotingapp_worker
        networks:
          - frontend
          - backend
        deploy:
          mode: replicated
          replicas: 1
          labels: [APP=VOTING]
          restart_policy:
                condition: on-failure
                delay: 10s
                max_attempts: 3
                window: 120s
          placement:
                constraints: [node.role == manager]

  visualizer:
        image: dockersamples/visualizer:stable
        ports:
          - "8080:8080"
        stop_grace_period: 1m30s
        volumes:
          - "/var/run/docker.sock:/var/run/docker.sock"
        deploy:
          placement:
                constraints: [node.role == manager]

networks:
  frontend:
  backend:

volumes:
  db-data:
docker stack deploy –compose-file docker-stack.yml vote
First deploy it, and then we will look more deeply into the details:
Y:\projects_id3\P5N001\XLOGCA135_tutorial_docker\tutorial_docker\samples\labs\votingapp\example-voting-app>docker stack deploy --compose-file docker-stack.yml vote
Creating network vote_backend
Creating network vote_default
Creating network vote_frontend
Creating service vote_visualizer
Creating service vote_redis
Creating service vote_db
Creating service vote_vote
Creating service vote_result
Creating service vote_worker
docker stack services vote
to verify your stack has deployed, use docker stack services vote
Y:\projects_id3\P5N001\XLOGCA135_tutorial_docker\tutorial_docker\samples\labs\votingapp\example-voting-app>docker stack services vote
ID                  NAME                MODE                REPLICAS            IMAGE                                          PORTS
d7ovptjpvv3y        vote_vote           replicated          0/2                 dockersamples/examplevotingapp_vote:before     *:5000->80/tcp
lve7cp7gxvwg        vote_result         replicated          0/1                 dockersamples/examplevotingapp_result:before   *:5001->80/tcp
r2mhivfbyaun        vote_redis          replicated          1/1                 redis:alpine                                   *:30000->6379/tcp
szzocr20dyfc        vote_visualizer     replicated          1/1                 dockersamples/visualizer:stable                *:8080->8080/tcp
vgv0iucy6fx9        vote_db             replicated          0/1                 postgres:9.4
vlieeu7ru24a        vote_worker         replicated          0/1                 dockersamples/examplevotingapp_worker:latest
Analyse du fichier Docker compose file : docker-stack.yml
If you take a look at docker-stack.yml, you will see that the file defines
- vote container based on a Python image
- result container based on a Node.js image
- redis container based on a redis image, to temporarily store the data.
- DotNET based worker app based on a .NET image
- Postgres container based on a postgres image
The Compose file also defines two networks, front-tier and back-tier.
Each container is placed on one or two networks.
Once on those networks, they can access other services on that network in code just by using the name of the service.
Services can be on any number of networks.
Services are isolated on their network.
Services are only able to discover each other by name if they are on the same network.
To learn more about networking check out the Networking Lab.
compose-file: “3”
Take a look at the file again. You’ll see it starts with:
version: "3"
It’s important that you use version 3 of compose files, as docker stack deploy won’t support use of earlier versions.
compose-file: services
You will see there’s also a services key, under which there is a separate key for each of the services. Such as:
vote:
        image: dockersamples/examplevotingapp_vote:before
        ports:
          - 5000:80
        networks:
          - frontend
        depends_on:
          - redis
        deploy:
          replicas: 2
          update_config:
                parallelism: 2
          restart_policy:
                condition: on-failure
compose-file: image
The image key there specifies which image you can use, in this case the image dockersamples/examplevotingapp_vote:before.
If you’re familiar with Compose, you may know that there’s a build key, which builds based on a Dockerfile.
However, docker stack deploy does not suppport build, so you need to use pre-built images.
compose-file: ports and networks depends_on
Much like docker run you will see you can define ports and networks.
There’s also a depends_on key which allows you to specify that a service is only deployed after another service, in this case vote only deploys after redis.
compose-file: deploy
The deploy key is new in version 3.
It allows you to specify various properties of the deployment to the Swarm.
In this case, you are specifying that you want two replicas, that is two containers are deployed on the Swarm. You can specify other properties, like when to restart, what healthcheck to use, placement constraints, resources.
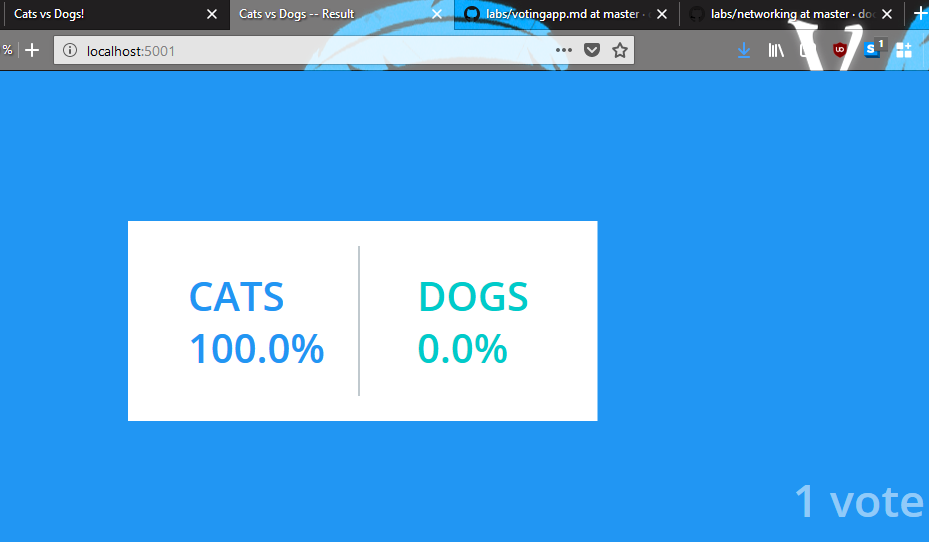
Test run : http://localhost:5000/
Now that the app is running, you can go to http://localhost:5000 to see:
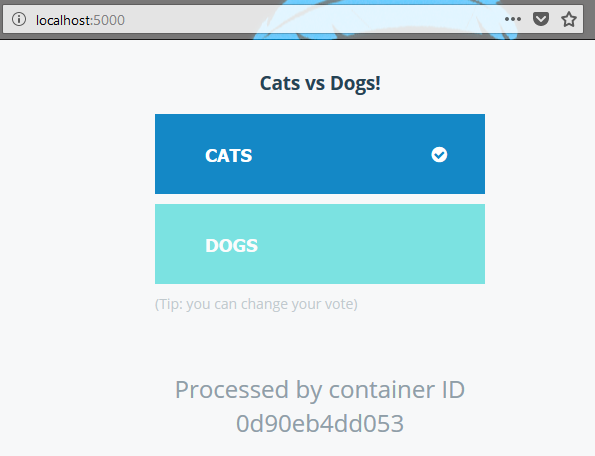
Click on one to vote. You can check the results at http://localhost:5001
Note
If you are running this tutorial in a cloud environment like AWS, Azure, Digital Ocean, or GCE you will not have direct access to localhost or 127.0.0.1 via a browser. A work around for this is to leverage ssh port forwarding.
Below is an example for Mac OS. Similarly this can be done for Windows and Putty users:
ssh -L 5000:localhost:5000 <ssh-user>@<CLOUD_INSTANCE_IP_ADDRESS>
Customize the app
In this step, you will customize the app and redeploy it.
We’ve supplied the same images but with the votes changed from Cats and Dogs to Java and .NET using the after tag.
Change the images used
Going back to docker-stack.yml, change the vote and result images to use the after tag, so they look like this:
vote:
  image: dockersamples/examplevotingapp_vote:after
  ports:
    - 5000:80
  networks:
    - frontend
  depends_on:
    - redis
  deploy:
    replicas: 2
    update_config:
      parallelism: 2
    restart_policy:
      condition: on-failure
result:
  image: dockersamples/examplevotingapp_result:after
  ports:
    - 5001:80
  networks:
    - backend
  depends_on:
    - db
  deploy:
    replicas: 2
    update_config:
      parallelism: 2
      delay: 10s
    restart_policy:
      condition: on-failure
Redeploy: docker stack deploy –compose-file docker-stack.yml vote
Redeployment is the same as deploying:
docker stack deploy --compose-file docker-stack.yml vote
Y:\projects_id3\P5N001\XLOGCA135_tutorial_docker\tutorial_docker\samples\labs\votingapp\example-voting-app>docker stack deploy --compose-file docker-stack.yml vote
Updating service vote_db (id: vgv0iucy6fx9ih4so6ufdzqh4)
Updating service vote_vote (id: d7ovptjpvv3ylpxb30hitxd1g)
Updating service vote_result (id: lve7cp7gxvwge1qhesjwuyon1)
Updating service vote_worker (id: vlieeu7ru24a8kc4vouwa0i5r)
Updating service vote_visualizer (id: szzocr20dyfc6ux0vdmamo5e1)
Updating service vote_redis (id: r2mhivfbyaunnd5szq5kh5fm7)
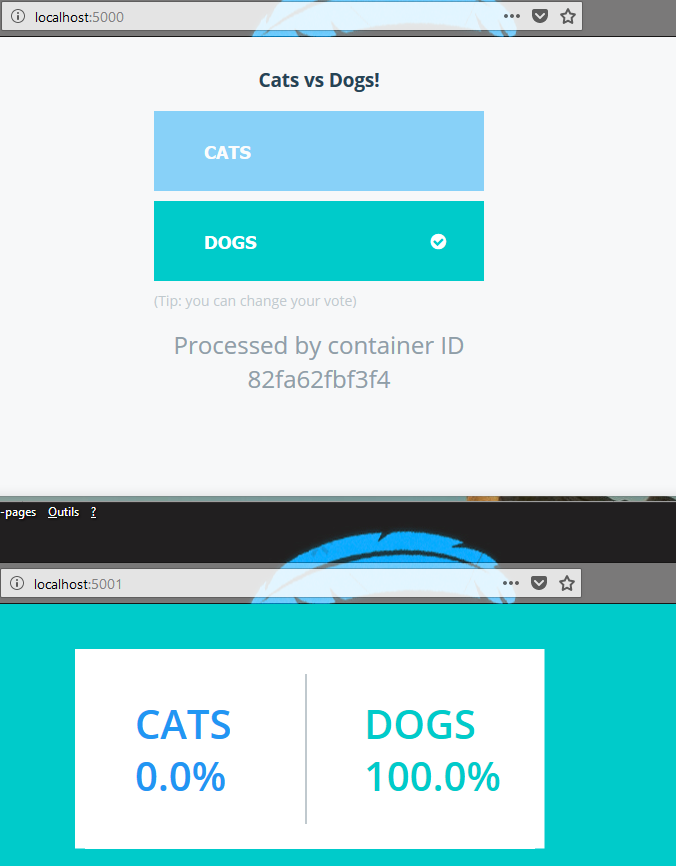
Another test run
Now take it for a spin again. Go to the URLs you used in section 3.1 and see the new votes.

Remove the stack
Remove the stack from the swarm:
docker stack rm vote
Removing service vote_db
Removing service vote_redis
Removing service vote_result
Removing service vote_visualizer
Removing service vote_vote
Removing service vote_worker
Removing network vote_frontend
Removing network vote_default
Removing network vote_backend
Next steps
Now that you’ve built some images and pushed them to Docker Cloud, and learned the basics of Swarm mode, you can explore more of Docker by checking out the documentation.
And if you need any help, check out the Docker Forums or StackOverflow.